How to Decide Which B Rate to Use Arduino
This library is fairly easy to use and supports many different types of IR remotes. LoRa supports data rates ranging from 300 bps to 5 kbps for a 125 kHz bandwidth.

Useful Arduino Projects With Robots Maxbotix Inc
Pin the LED is connected to int blinkRate0.
. In this project we will design HeartbeatPulseBPM Rate Monitor using Arduino Pulse Sensor. Library written by Ra Khan and. On the other hand the Uno board is 686 mm long and has a width of 534 mm.
Used to find peak in pulse wave seeded volatile int T 512. Configure the parameter of Frequency to 470MHz RF air date rate to 19200bps serial rate to 19200bps. Reading a control encoder with an Arduino is actually fairly straightforward.
Serialprintlnn Vs Vo Rt. Arduino hasnt been consistent in terms of USB using various USB packages on different boards. Blink rate stored in this variable void setup Serialbegin9600.
Initialize serial port to send and receive at 9600 baud pinModeledPin OUTPUT. For most applications it doesnt matter that much as long as the value matches in the code and the Serial Monitor window setting. If these two baud rates dont match you get a bunch of garbled stuff printed to the Arduino console Serial Monitor window.
Try entering the following into the Serial Monitor and clicking Send. Used to find peak in pulse wave seeded volatile int T 512. You can even use a 162 LCD display.
Hi I appreciate help to use buttons on arduino or esp32 board and send data by bluetooth that I can use it in MIT app inventor. Now that the program has been written to the board you can try it out. Used to find trough in pulse wave.
Choose the PC serial as COM5 then the tool will show Found device. This library ports the latest FreeRTOS 1021 and allow you to create FreeRTOS Projects in the in Arduino IDE. The UI shown below is the interface of setting tool.
We just need to read input pulses and count them. Re-set to true to see Arduino Serial Monitor ASCII Visual Pulse volatile int rate10. ADR controls the following transmission.
The setup function establishes communication parameters with the host computer before running the main code. Its quite a simple tutorial but is an essential one especially when you are working on some power related project. I want to clone the software on the other working board to a new board.
CH B Output B. Arduino UNO and MEGA users have to use USB type B while LEONARDO DUE MICRO and LILYPAD fans have to use micro USB. You can nd the source code of this library here on GitHub.
Change the baud rate in the sketch from 9600 to 115200 and upload it to the board again. Void setup Serial. CAN-BUS Shield V2 2450 This CAN-BUS Shield adopts MCP2515 CAN Bus controller with SPI interface and MCP2551 CAN transceiver to give your ArduinoSeeeduino CAN-BUS capability.
Used to determine pulse timing volatile unsigned long lastBeatTime 0. Begin 9600. Up to 5 cash back SerialReceive sketch Blink the LED at a rate proportional to the received digit value const int ledPin 13.
Used to find IBI volatile int P 512. Set this pin as output void loop if. With an OBD-II converter cable added on and the OBD-II library imported you are ready to build an onboard diagnostic device or data logger.
Every few seconds and then receive it by bluetoothClient in MIT app even in my case is possible to display values assinged to button press. NANO and FIO users need mini USB whereas the YUN board implements USB type A in a vertical right angle. It means that if you are finding it difficult to fit the Uno board in your project because of.
Tools Serial Port devttyACM0. Used to find IBI volatile int P 512. Arduino Nano is a 45 mm-long board with a with of 18 mm.
Used to determine pulse timing volatile unsigned long lastBeatTime 0. Tools Board Arduino Uno. We will begin our rotary encoder experiments using the control encoder.
Void loop Now lets tackle the first step of our algorithm we create a character array to hold the incoming message and a position variable to help us move through each element in the array. Open the Arduino IDE and click sketch - Include Library - Add ZIP Library and choose the Seeed_Arduino_FreeRTOS file that youve have just downloaded. I used a 204 LCD panel to display the pulse rate in BPM.
I found the command to do just that in avrdude - avrdude -v -v -v -v -c arduino -Pcom3 -p ATMEGA328P -U flashwCsareearduinonew_workinghexi -b 57600. Used to find trough in pulse wave. It is no issue to send data from esp32 by bluetooth periodically eg.
Then after opening the Serial Monitor select 115200 from the drop-down list. Open a serial monitor I use the one that is included with the Arduino IDE and ensure that the baud rate is set to 9600. We will see how to use this with an Arduino to measure the motor RPM very soon.
Open serial port and set data rate to 9600 bps SerialprintlnThermistor voltage and resistance measurement. You can interface the pulse sensor with Arduino for monitoring HeartbeatPulseBPM Rate. In case you use Arduino UNO Arduino Duemilanove Nano Arduino Mega 2560 or Diecimila you will need a standard USB cable A plug to B plug the kind you would connect to a USB printer as shown in the following image.
Now lets see just how fast our Arduino can communicate. Array to hold last ten IBI values volatile unsigned long sampleCounter 0. If asked for a sketch directory use the default or choose something like Arduino.
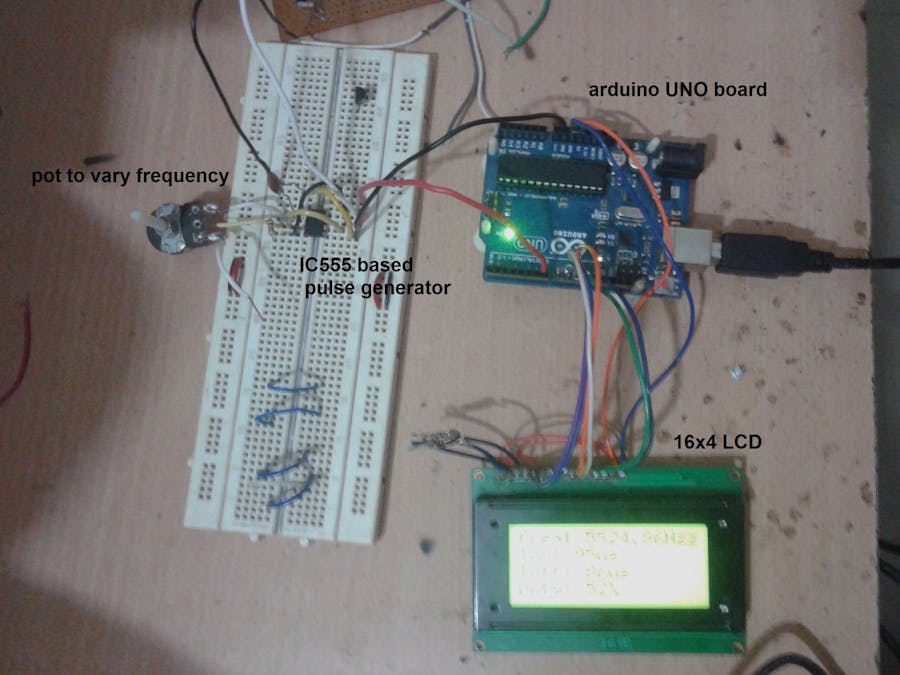
Re-set to true to see Arduino Serial Monitor ASCII Visual Pulse volatile int rate10. Today I am going to share on How to measure Frequency using Arduino board. That is the maximum possible sampling rate but the actual sampling rate in your application depends on the interval between successive conversions calls.
If you are using a different type of Arduino you should match your processor board. To maximize the battery life of each end-device and the overall capacity available through the network LoRaWAN uses an Adaptive Data Rate ADR mechanism for optimizing data rates airtime and power consumption. A common baud rate is 9600 as is 115200.
Hi I have a old machine which uses 2 pro-mini 5V 16MHz boards unfortunately one board is damaged. If youre using the Arduino IDE Serial Monitor window to send data the baud rate can be set using a drop down menu. The width of the Arduino Nano is approximately one-third of the Uno board which is a very significant difference.
When you send text to the Arduino you should find that it. Firstly connect APC220 with PC than doubleclick the RF tool. Array to hold last ten IBI values volatile unsigned long sampleCounter 0.
Each conversion in AVR takes 13 ADC clocks so 125 KHz 13 9615 Hz. If you see devttyUSB0 as the Serial Port choice accept it. Step 1 First you must have your Arduino board you can choose your favorite board and a USB cable.
Because in Power projects you have to measure the frequency of AC voltages. For a 16 MHz Arduino the ADC clock is set to 16 MHz128 125 KHz.

40 Mile Range Arduino Mega Piggy Back All In One Solution Sensors Control Telemetry Video Arduino Arduino Projects Electronics Projects

How To Hack With Arduino Building Macos Payloads For Inserting A Wi Fi Backdoor Arduino Mac Address Lock Picking Tools
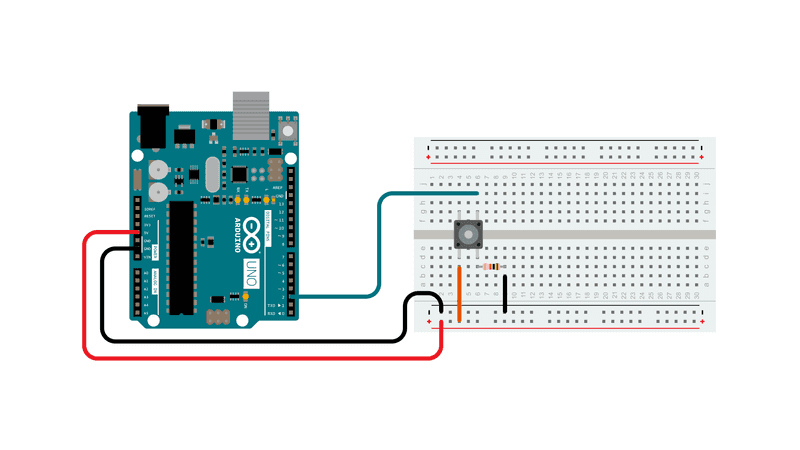
Frequency And Duty Cycle Measurement Using Arduino Arduino Project Hub

Nodemcu V3 Pinout Shopofthings Led Matrix Electronic Circuit Projects Electronics Projects Diy

Diy Arduino Ph Meter Using Gravity Ph Sensor

Pin On New Books

Pin On Coding
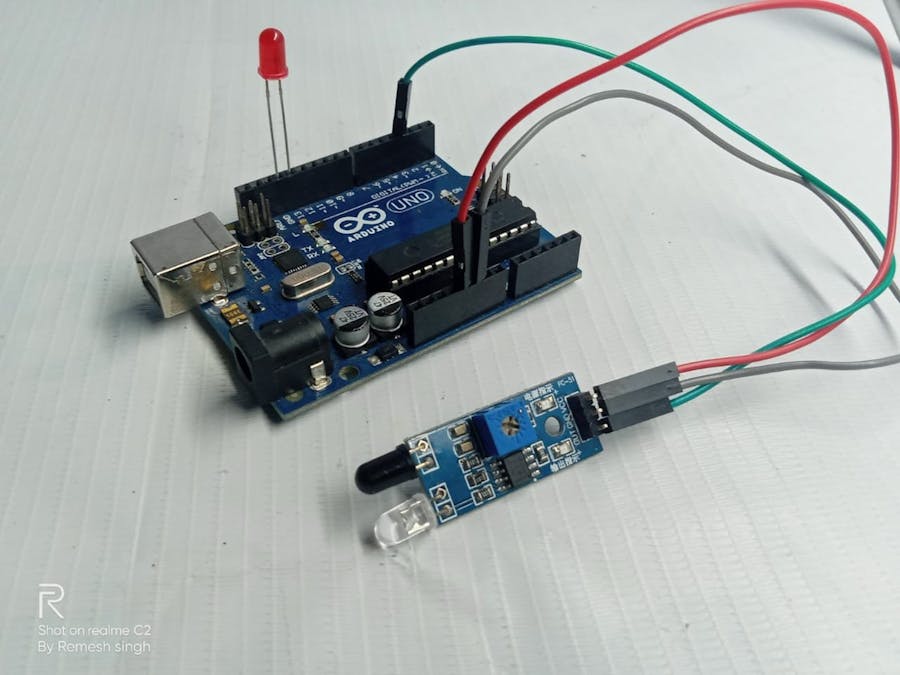
How To Use Ir Sensor With Arduino With Full Code Bihar Arduino Project Hub

Arduino Controlled Light Dimmer Arduino Dimmer Dim Lighting
Arduino With Ir Sensor Arduino Project Hub

Arduino Projects Line Follower Robot Arduino Projects Arduino Robotics Projects
Digital Read Serial Arduino
30 Great Arduino Projects With Step By Step Video Instructions

Particle Company News And Updates Particle Arduino Projects Electronics Projects Pi Projects

Components Of The Arduino Based Strain Gauge A Arduino Uno R3 B Download Scientific Diagram

Pcduino Is A Mini Pc Platform That Runs Pc Like Os Such As Ubuntu And Android Ics It Outputs Screen To Hdmi Development Board Arduino Ubuntu Operating System
Connect Multiple I2c Devices To Arduino Using I2c Multiplexer Tca9548a

Max232 And Atmega328 On Breadboard Arduino Bread Board Hardware
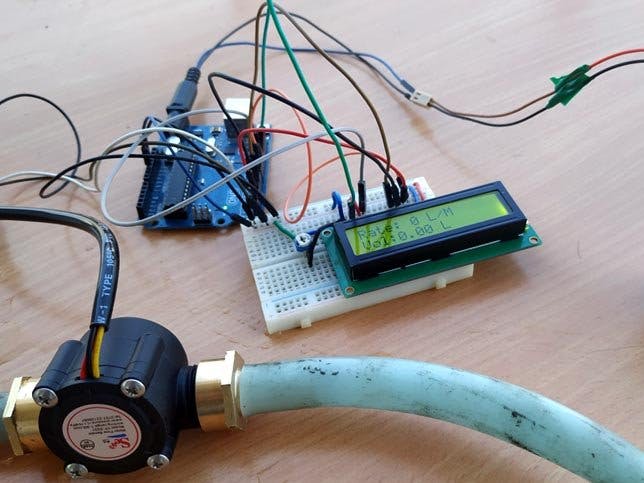
Water Flow Rate And Volume Measurement Using Arduino In 2020 Arduino Project Hub


Comments
Post a Comment